Tea light #card – Maja Design #tutorial
Hi Everybody!
I’ve promised you a tea light card tutorial for quite some time now. I’m sorry that
I’ve kept you waiting, but here it finally is.
Today I’m going to give you a detailed walk through on
how to make this card using the Maja Design Vintage Winter collection.

Inside

Tea light cards are really fun to make and make great gifts. You can make them all year around and put candy in them instead of tea lights. If you have a 6×6 patterned paper pad you’ll definitely have a great afternoon.
You will need…
Cardstock
9 9/16 x 6 (24,3 x 15,3 cm)
7 7/8 x 8 5/8 (20×22 cm)
Patterned paper (I’ve used Vintage Winter 6×6 pad by Maja Design for this tutorial)
Scoring board (or use your trimmer to score, works just as fine)
Spellbinder dies or similar
Ribbon
6 tealights
Distress Ink or similar to chalk the edges
Stamps (all stamps in this tutorial are from the Vintage Winter collection by Maja Design)
Decorations (flowers etc)
Edge punch (optional)
So let’s get going!
Start on the largest piece of cardstock (9 9/16 x 6) to make the cover. Score it by 4 5/8 (11 cm) from each side. I have used an edge punch (Martha Stewart Stars) for the border.

Take out the second piece of cardstock (7 7/8 x 8 5/8) and score the longest side on 3 1/4, 3 15/16, 7 1/16, 7 7/8. (8, 10, 18, 20 cm.)

Score the short side of the paper by 3/4, 1 9/16, 6 5/16, 7 1/16. (2, 4, 16, 18 cm)

Cut away the extra paper in the corners.
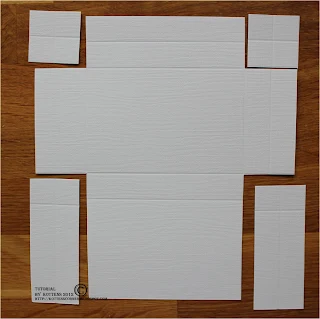
Cut the flips.

Distress all the visible edges. I’ve used Distress Ink Walnut Stain.

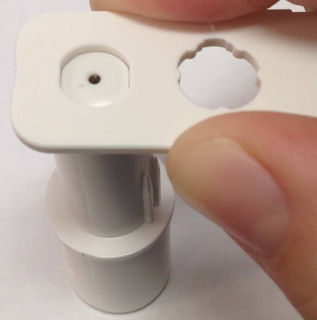
We are now going to make a hole in the box to make the tea lights visible. There are several ways to do this, I’m going to show how I’m doing it with my Cuttlebug.

First I make a cross on the backside to get the middle of the paper where the hole will be. I put my Nestabililties die on the paper and fasten it with some tape.

I take my A and C plate and put them upon the backside of the box.

I gently fold the box over the A and C plate so I get the die visible.

Then I add my B plate on top of it and run the whole package through my Cuttlebug. In that way I get a perfect hole, even though the paper is larger then the plates.
You can use a die as a template and draw on the inside of the box and then use scissors to cut out the hole if you want to. If you don’t have a die cutting machine you can use whatever shape you like as a template and draw on the inside and then cut it out with scissors as well.
If you want to you can add the patterned paper to the box before you make the cutting and get a perfect hole in that too. I prefer to make the cardstock a bit visible and therefor use two different dies for the hole. One oval for the cardstock and one scalloped oval for the patterned paper.
You’ll need the following patterned papers for the box
3×4.5 (7,5 x 11,5 cm)
2 pieces of 0.5×4.5 (1,5 x 11,5 cm)
2 pieces of 0.5×3 (1,5 x 7,5 cm)
You can fit them all into one piece of 6×6 patterned paper.

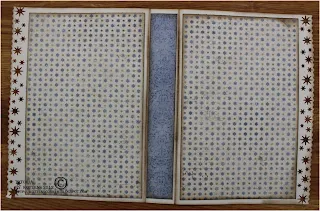
Add a piece of 3×4.5 overhead paper on the inside of the box to make a window.This will prevent the tea lights from falling out. You can also use at gelatine leaf, it’s a bit more decorative.
Tip! Don’t throw away the cut out pieces from the window. They make an excellent decoration on the cover. I’ve used them on the cover on this particular tea light card.
Glue the long side of the flap so you can fold it to a box with two openings.

Now it’s time to fix the inside and cover of the box. The sizes of the patterned papers depends on what kind of punch you’ve used, or if you’ve used any at all. The sizes that I’ve used are based on the Martha Stewart Stars punch.
You will need the following patterned papers for the inside of the cover
2 pieces of 3 5/8 x 5 5/8 (9,2 x14,3 cm). 4 1/8 x 5 5/8 (10,5 x 14,3 cm) if you haven’t used an edge punch.
1 piece of 13/16 x 5 5/8 (2 x 14,3 cm)
For the pocket on the left side you will need…
Cardstock 3.5 x 3 5/8 (8,9 x 9,2 cm)
Patterned paper 3.25 x 3 3/8 (8,3 x 8,6 cm)
Some paper for the tag. I have cut out one of the postcards from the 12×12 die cut sheet (Vintage Winter collection).

You will need the following patterned papers for the outside of the cover
2 pieces of 3 5/8 x 5 5/8 (9,2 x14,3 cm) 4 1/8 x 5 5/8 (10,5 x 14,3 cm) if you haven’t used an edge punch.
1 piece of 13/16 x 5 5/8 (2 x 14,3 cm)
Attach a ribbon (I used about 0,8 yd or 75 cm) before gluing the patterned papers.

Now it’s time to attach the box. I recommend that you use a strong glue for this since it is quite heavy. I’ve used the same amount of ribbon that I put under the box before gluing it.


I’ve promised you a tea light card tutorial for quite some time now. I’m sorry that
I’ve kept you waiting, but here it finally is.
Today I’m going to give you a detailed walk through on
how to make this card using the Maja Design Vintage Winter collection.

Inside

Tea light cards are really fun to make and make great gifts. You can make them all year around and put candy in them instead of tea lights. If you have a 6×6 patterned paper pad you’ll definitely have a great afternoon.
You will need…
Cardstock
9 9/16 x 6 (24,3 x 15,3 cm)
7 7/8 x 8 5/8 (20×22 cm)
Patterned paper (I’ve used Vintage Winter 6×6 pad by Maja Design for this tutorial)
Scoring board (or use your trimmer to score, works just as fine)
Spellbinder dies or similar
Ribbon
6 tealights
Distress Ink or similar to chalk the edges
Stamps (all stamps in this tutorial are from the Vintage Winter collection by Maja Design)
Decorations (flowers etc)
Edge punch (optional)
So let’s get going!
Start on the largest piece of cardstock (9 9/16 x 6) to make the cover. Score it by 4 5/8 (11 cm) from each side. I have used an edge punch (Martha Stewart Stars) for the border.

Take out the second piece of cardstock (7 7/8 x 8 5/8) and score the longest side on 3 1/4, 3 15/16, 7 1/16, 7 7/8. (8, 10, 18, 20 cm.)

Score the short side of the paper by 3/4, 1 9/16, 6 5/16, 7 1/16. (2, 4, 16, 18 cm)

Cut away the extra paper in the corners.

Cut the flips.

Distress all the visible edges. I’ve used Distress Ink Walnut Stain.

We are now going to make a hole in the box to make the tea lights visible. There are several ways to do this, I’m going to show how I’m doing it with my Cuttlebug.

First I make a cross on the backside to get the middle of the paper where the hole will be. I put my Nestabililties die on the paper and fasten it with some tape.

I take my A and C plate and put them upon the backside of the box.

I gently fold the box over the A and C plate so I get the die visible.

Then I add my B plate on top of it and run the whole package through my Cuttlebug. In that way I get a perfect hole, even though the paper is larger then the plates.
You can use a die as a template and draw on the inside of the box and then use scissors to cut out the hole if you want to. If you don’t have a die cutting machine you can use whatever shape you like as a template and draw on the inside and then cut it out with scissors as well.
If you want to you can add the patterned paper to the box before you make the cutting and get a perfect hole in that too. I prefer to make the cardstock a bit visible and therefor use two different dies for the hole. One oval for the cardstock and one scalloped oval for the patterned paper.
You’ll need the following patterned papers for the box
3×4.5 (7,5 x 11,5 cm)
2 pieces of 0.5×4.5 (1,5 x 11,5 cm)
2 pieces of 0.5×3 (1,5 x 7,5 cm)
You can fit them all into one piece of 6×6 patterned paper.

Add a piece of 3×4.5 overhead paper on the inside of the box to make a window.This will prevent the tea lights from falling out. You can also use at gelatine leaf, it’s a bit more decorative.
Tip! Don’t throw away the cut out pieces from the window. They make an excellent decoration on the cover. I’ve used them on the cover on this particular tea light card.
Glue the long side of the flap so you can fold it to a box with two openings.

Now it’s time to fix the inside and cover of the box. The sizes of the patterned papers depends on what kind of punch you’ve used, or if you’ve used any at all. The sizes that I’ve used are based on the Martha Stewart Stars punch.
You will need the following patterned papers for the inside of the cover
2 pieces of 3 5/8 x 5 5/8 (9,2 x14,3 cm). 4 1/8 x 5 5/8 (10,5 x 14,3 cm) if you haven’t used an edge punch.
1 piece of 13/16 x 5 5/8 (2 x 14,3 cm)

For the pocket on the left side you will need…
Cardstock 3.5 x 3 5/8 (8,9 x 9,2 cm)
Patterned paper 3.25 x 3 3/8 (8,3 x 8,6 cm)
Some paper for the tag. I have cut out one of the postcards from the 12×12 die cut sheet (Vintage Winter collection).

You will need the following patterned papers for the outside of the cover
2 pieces of 3 5/8 x 5 5/8 (9,2 x14,3 cm) 4 1/8 x 5 5/8 (10,5 x 14,3 cm) if you haven’t used an edge punch.
1 piece of 13/16 x 5 5/8 (2 x 14,3 cm)
Attach a ribbon (I used about 0,8 yd or 75 cm) before gluing the patterned papers.

Now it’s time to attach the box. I recommend that you use a strong glue for this since it is quite heavy. I’ve used the same amount of ribbon that I put under the box before gluing it.

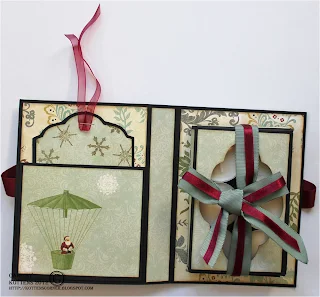
All that is left now is decorating the box. Here’s how my turned out… Once again…
I’ve used 3D foam for the stars to get a more dimensional effect.

I’ve used the following decorations…
Distress Markers for colourizing the Maja stamp
Antique Linen
Brushed Corduroy
Vintage Photo
Walnut Stain
Pumice Stone
Weathered Wood
Stormy Sky
Wild Honey
Fired Brick
Stars have been cut out from the 6×6 Vintage Winter pad.
All flowers by Wild Orchid Crafts.
All ovals are Nestabilities dies.
Here are some other examples of tea light cards I’ve made in the past, just for inspiration…


I hope you got inspired!
This tutorial is coming from "Kottens Corner"
http://www.jenny.grotherus.com
Happy Creation;)
Anki J
Anki J


Kommentarer
Skicka en kommentar