Inlägg

Visar inlägg från juli, 2015

How-to-make a 3D-Butterfly canvas with your Silhouette

Bild
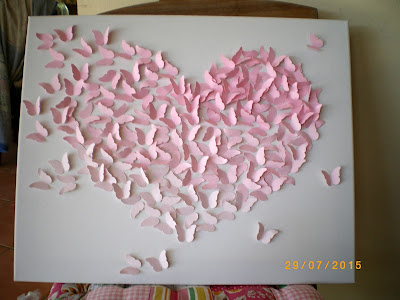
Hi there, todays 3D-Butterfly on Canvas tutorial is a very easy and you can use it for a lot of different designes. Material I have used: * 30x40 cm (12 x 16") canvas * 3 cardstock in pink shades  * Strong glue or gluegun * Silhouette cutting machine Start to make a template of the heart, I did mine from Nested Stitched Heart Shapes by Sarah Hurley in Silhouette Store First a ungrouped them and deleted the 4 smallest, I took away the dots inside the bigest heart and rotated it 45° CW, then I increased it as much as I could, now it looks like this                                                                                                                                                                   I cut it out on vinyl that I had in my stash. You can also use cardstock or something in your stash. Put it on the canvas in the center and made some small marks around the heart. Next step was to make a LOT of butterflies to

Beautiful and Easy Singed (Melted) Fabric Flower Tutorial

Bild

Fold Card in Silhouette Studio

Bild
Hi there, todays tutorial is Accordion Fold Card in Silhouette Studio. One of the keys to creating a great word accordion fold card is to find the right font. I like to use a bold font where the letters are close to the same width. Check out this tutorial on my method to choose the perfect font every time. I am going to use the Kimberley font which you can download for free at dafont.com . If you have a Silhouette Portrait the first step is go to Design Page Settings. Change the Page Size to Width of 12 in and Height of 8.5 in and choose the Landscape orientation for the mat. Silhouette Cameo users can skip this step. Use the text tool to type the word MOM using the Kimberley font at 500 point. Then right click on the word and choose Ungroup. I like to make my accordion fold cards so that each letter is the same width and height. This makes the card fold nicely for a clean look. We are going to resize the letters.  You can start by deleting the second M, because

Going back to Thailand

Hi there, Jiiiippie!! We are going back to Thailand on Sunday, it means that I will  return to my Cr af tin g -ro o m . I already have a lot on my To-do list. Etching on glass, Heat transfer vinyl (HTV) and making new lovely cards with my Silhouette Cameo and all other things I have there. And I'm also going to redo our master bedroom, and a lot, lot more that I'm going to share here on the blog. Happy Creating;) Anki J

Birthday card for Damian

Bild
Hi there, today is my grandson Damian 7'nd birthday, ig boy now!  I made a hinge card for him, and he loves paintball as you can see from the card design.  This is the front of the hinge card! Inside and Here is before I put it together How to make it: * I have cut out from white cardstock 20x10,5cm for the front and 21x10,5cm for  the back.  * Score the top on 1 cm on the back pice, fold it and put some doublesided tape  on the folded part.  * Cut a smaller panel of colored cardstock and a even smaller piece of white  cardstock, make 2 set of this, one for inside of the card and one for the front. * Married the 2 pieces together. * Decorate the front panel as you pleased and glue it on the white front panel. * Decorate the inside and remember to make it flat, and glue this on the white  back pice.  *Put the front and the back together and you have a hinge card. Happy Creation:) Anki J