Inlägg

Visar inlägg från juli, 2014

Triangular Boxes - Stampin Up!

Bild
Hi you Creative card/scrap maker, This cute little Triangular Boxes I made after seen the video from Pootles Papercraft. How I made it, you can see  HERE The tag is from JustRitepaperCraft and I cut out in two sizes, found a nice sentiment on internet that I printed  and cut out, also distressed them a little bit. Decorate with a flower from my stash and some rhinestones. Happy Creation;) Anki J

New NoteCard for my Etsy shop!

Bild
Hi there, Oops I've been lacy this summer with creating cards. Well I have been babysitting and have had a lot of friends here. But now I'm on the road again, this little cut NoteCard was made for a couple of day a go... And you can see them also in my Etsy shop, there is a link on the left here on my blog. Happy Creation;) Anki J

Stampin' Up! 3x3 box Tutorial

Flowers, Ribbons and Pearls: Friday Freebie 019

Bild
Flowers, Ribbons and Pearls: Friday Freebie 019 : Hi Everybody, This lovely red and white card is up for grabs today and it has lots of layers to it.  It is a 6 x 8 inch card and the insid...

How to Measure and Layer to Cover a Notebook Tutorial

Dawn's Swap for Stampin'Up! Convention 2014

New Give Away for July included Spellbinders

Bild
This is a Give Away from Flower, Ribbons and Pearls. The contest is ending 27 of july. So don't miss this beautiful scrapboking items! Good Luck to all of us and Happy Creation;) Anki J

Flowers, Ribbons and Pearls: Friday Freebie 018

Bild
Flowers, Ribbons and Pearls: Friday Freebie 018 : Hi Everybody, Todays cards is in a lovely shade of teal and white and I have used the Tied Together embossing folder along the bottom. O...

A nice NoteCard for a dear friend

Bild
A NoteCard that I made for a couple of days ago. The sentiments are in Swedish and it says "You can never control the wind, just inform their sails". Hope that the translation is correct. The size is 5½ x 4½ inc. Happy Creation;) Anki J

Tealight Candle Card

Bild
My Tealight Candle Card! When you want to give something that is a little more than just  a card then this is one idea you may want to try. The tealight candle card is very easy to do and the tealights used are cheap to buy.                                                  This tutorial Is from  card-making-magic.com   I have used a larger sized card that is 14 x 14 inches square for this, and I have done the project in inches. Step 1 Cut your card down to 9" x 12" and across the top and bottom of the long sides measure in 3/4" I would advise you to make a  template  as a practise run first and then keep this to one side for future reference. You can make all the marks and measurements on this first to get the idea of what to do, before you start on your good stuff.  Step 2 With the good side of the card face down, from the left hand, short edge start your measuremnts. I have used coloured pens to highlight them so they are easier to read

Easy paperflower to make

Bild
nettantrollet.wordpress.com I know the tutorial is in Swedish but I think you can understand the picctures Happy Creation;) Anki J

Scrapberrys

Bild
Flowers, Ribbons and Pearls: Scrapberrys : Hi Everybody, Todays card is made with products from a company called Scrapberrys  and their aim is to provide quality items to the Europe...

New Birthday Card for Ronja, with Spellbinders dies

Bild
Nytt kort med Spellbinders stansar - New Birthday Card with Spellbinders dies Detta kort är gjort i A5 stående format. Basen är i vitt och där efter har jag lagt ett ljung rosa, blommig cardstock. Använde en ljusrosa cardstock som jag monterade ett embossat  grått glitter papper på. Jag använde "Spellbinders S4-356 Nestabilities Decorative Elements Floral Ovals Die Templates" på vit cardstock, den största och den näst största, där jag monterade ett foto på en liten flicka, i vintage stil. Som dekoration gjorde jag 2 pointsettia blommor med stans från "Magnolia Christmas DooHickeys". I dessa satte jag 2 smaragdgröna brads. Använde "Spellbinders S2-048 Shapeabilities Sprigs Die D-Lites Templates" för att få lite blad till blommorna. Satte också några vita tyg rosor samt några pappers blomknoppar, samt en gul/grön trippel-rosett. En stansad fjäril i högra övre hörnet från Memory Box "Rhone Butterfly Wings Die". Inuti kort

18cm 7inchTriangular Box Tutorial by Stampin' Up! UK Independent Demonst...

Flowers, Ribbons and Pearls: Friday Freebie 017

Flowers, Ribbons and Pearls: Friday Freebie 017 : Hi Everybody, Todays card is in a beautiful peach color and has a Tattered Lace background to it The outside of the card and the sentime...

fel på leverans av spellbinders stansar - wrong delivery of spellbinders dies

Bild
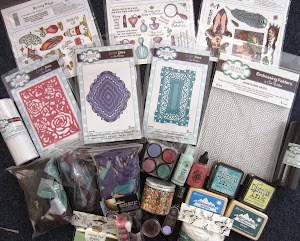
Jamen kan man bli trött eller trött... Jag har under våren och sommaren beställt ett antal stansar via online butiker runt om i världen för att få lite häftiga stansar. Men kan det bli rätt när man beställer, NEJ utav 10 beställningar har nog 6 varit fel leverans, fattar inte vad som är felet, kan de inte läsa i USA eller England? Man jag har haft tur för jag har inte behövt skicka tillbaka dem, utan fått den rätta inom 1 vecka alldeles gratis, och ja Gratis är gott!! Jag hade beställt Grand Decorative. * Got my parcel from  www.heartfeltcreations.us  and ofcourse it was wrong dies, I send the company a email, and they emediatly send the correct dies with express delivery! That I call good service, and I can keep the wrong one. I order the Spellbinders Grand Decorative Nestabilities. I have order some dies this spring and summer and have had 6 delivery of 10, that have been wrong... Happy Creation;) Anki J

Shabbychic loop flower tutorial.

Flitig med "Thank You" note card

Bild
Tycker att jag varit flitig med att göra några note card till min Etsy butik. Hade lite strul med att göra egna kuvert, men det löste sig efter mycket möda och pappers spill. * Well, have been doing some Note Card for my Etsy shop. It was not so easy to make my own envelopes, it took a lot of time and energy, but now they are ready to fit my cards.  Korten mäter 9 x 7 cm. Det första säljs som 1 st, och den sista här säljes ett set om 3 inkl. kuvert. * The cards are measure 9x7 cm. The first beautiful card is only one and comes with a envelop, and the last one is coming in 3 also with envelopes. Happy Creation;) Anki J

Hittade ny tävling - found a new "Give Away"...

Bild
I dag hittade jag en ny tävling med massor av fina scrapp produkter att vinna från Sue Wilson, en av mina favorit designers på stansar. Du ser bilden här på vänstersida med texten  PARTICRAFT BLOG CANDY CONTEST . Om du vill vara med så klickar du på den, väl inne på particraft.blogspot.se så scrollar du ned en bit och tittar på högersida där du hittar tävlingen, under "Fllowers"! Lycka till! *I have found a "Give Away" to day, at particraft.blogspot.com . It is Sue Wilsons blog and she is giving away a huge scraping package, this one you absolutely don't wan't to miss. On her site you scroll down and look at the right side, after "Followers" you find the contest. Good Luck to all of us! Happy Creation;) Anki J

Flowers, Ribbons and Pearls: Friday Freebie 016

Bild
Flowers, Ribbons and Pearls: Friday Freebie 016 : Hi Everybody, Todays cards is in a white with a lovely shade of green peeping through The sentiment can be for any occasion and it is dr...

Nytt kort med Creative Expressions Spanish Collection Seville

Bild
Dagens kort har jag väntat länge på att få tid att göra, det är så vackert att jag tänkt göra den i olika färger framöver... Stansen som innehåller 4 st, kommer från  Creative Expressions Spanish Collection Seville Titta och njut! Och så här gör man kortet: Spanis Collection-Seville Stansen, designad av Sue Wilson Det finns en video på hur man gör denna http://youtu.be/lGRY66rwgyE   som är gjord av card-making-magic.com Ut stansas: rosa/vit randigt papper eller liknande och vit cardstock 2 av den största i vitt cardstock 1 av den näst största i rosa/vit randigt 1 av den näst största i vitt som jag embossar med den 3:dje stansen 1 av den näst största och den 3:dje disen utstansad 2 av den minsta i ros/vit 2 av den minsta i vitt embossade med stansen, och 1 av dem skrev jag ut texten från min dator. De 2 första är basen i kortet, biga i övre kant på det ena strax innan första utskottet. Limma i hop med det andra. Sätt in det embossade papperet i