Inlägg

Visar inlägg från februari, 2016

Freebie Sunday, #Planner stickers for Mars

Bild
Hi there, and Happy Sunday, time for a new Freebie. Mars is coming quick and also Easter, so this month a made the #PlannerStickers with easter theme, I hope you like it, and have fun with it! Here you can download Your Free Silhouette v3 file Happy Creating;)

How-to make Italic fonts in Silhouette Studio.

Bild
Hi there, How in the earth can I make a Italic font when the Italic is grey in the font Style tool? *First you need the Silhouette Designer Edition* Type in the words that you would like to make Italic, from the Text tool Windows I chose the Bebas Neue font style And here you can see that this font is not possible to select Italic in the Font Style, and you can see that it is greyed out. (same with Bold) Mark the word that you would like to change Open up the Shear Window and on the words in the workspace you can now see small handles You can make the words lean to the right or left several ways, by selecting the Horizontal Shear 15º or, 30º  and so on... You can also select the Custom Horizontal Shear by dragging the handle until you are satisfied.  Play around with this so that you know how the words respond on different "Shear" Happy Creating;)

Silhouette Tip of the Day!

Bild
Hi there, It's very annoying when you have to browse all the fontStyle in Silhouette Studio, when you are looking for a nice font for your words/designs. I found out that in NexusFont  for PC and for Mac you have a charset already installed. Open the "Text style window"  in the Top meny Bar to the right. Then select the "Font Style" you wish to use... NOT GOOD! And abow here is the problem to browse thru all the fonts in Silhouette Studio. Instead install and use the NexusFont for PC and for Mac use the already installed software.  Open up your NexusFont Software, and type in the word or phrases that you would like to use  Change the size of the fonts, (options) some times it's easier to have them large   If you would like to see them in a specific color change it here Now you can browse thru all your fonts and see which one is perfect for your design! Happy Creating;)

Freebie Sunday, #Planner Dashboard

Bild
Hi there, and Happy Sunday, time for a new Freebie. This Dashboard, for A6 Planners, is ready to cut out or put into a plastic pocket and fuse  . I hope you like it as much as I do. Here you can download Your Free Silhouette v3 file Happy Creating;)

How-to make a nice Print and Cut Sticker in Silhouette Studio.

Bild
Hi there, I know that many of you are struggling with the print and cut feature, so here is a How-to make a nice Print and Cut Sticker tutorial. Open your print and cut design or makea new one. Enlarge the design by just take one corner and drag it. Mark your design by clicking on it, be sure that it is grouped Open the Offset Window Select the Offset tool set the Distance to 0,025 in Select the Corner tool Hit Apply And while the design is still marked (the new offset line) is it time to color it Select the Fill Color Windows Select the Pic a Color tool and point the mouse over the pink area inside the internal offset. Zoom in your design so you can see that it's filled with the same color that are closest to the offset that we did. Select the Cut Settings Tool Be sure that your design is marked, but not grupped,and select "No Cut" Now it should be no cut line at the offset we did, and insted a cut line to the interna

Silhouette Tip of the Day!

Bild
Hi there Here is the Silhouette Tip of the Day. If you can afford it Just invest in yourself and uppgrade to Designer Edition in Silhouette Studio. You get a lot of very useful tools that makes your designing so much easier Happy Creating ;)

Freebie Sunday, Paper with cute litle Bowes

Bild
Hi there, and Happy Sunday, time for a new Freebie. And also Happy Valentine! A couple of freebies away a made a cute bow - that one I used to make this adorble paper. Here you can download Your Free Silhouette v3 file Happy Creating;)

Silhouette Tip of the Day!

Bild
Hi there the shortcut for the Registration Marks for Print and Cut is m on your keyboard, this make everything so much easier!  Only press " m "on your keyboard when you are going to use the registration marks for Print and Cut Happy Creating;)

Silhouette Tip of the Day!

Bild
Hi there, When you are working with a design that are white, you can not see them in Silhouette Studio workspace. So here's the #Silhouette Tip of the Day, to make that easier to see Above here I wrote "workspace" both in red and white, and of course can't you see the white one. open the "Design Page Settings Window" go down to REVEAL, and drag the handle so you can see the grid, and the white design. You can also drag the white design to the Holding Area, but I think the Reveal option is working better Happy Creating;) 

Freebie Sunday, My Valentine's Card!

Bild
Hi there, and Happy Sunday, time for a new Freebie. Next sunday is it Valentine's day, and I have made a very cute and lovely #ValentineCard, ready to Print and Cut out.  Here you can download Your Free Silhouette v3 file Happy Creating;)

How-to use the Knife in Silhouette Studio. Nu på Svenska!

Bild
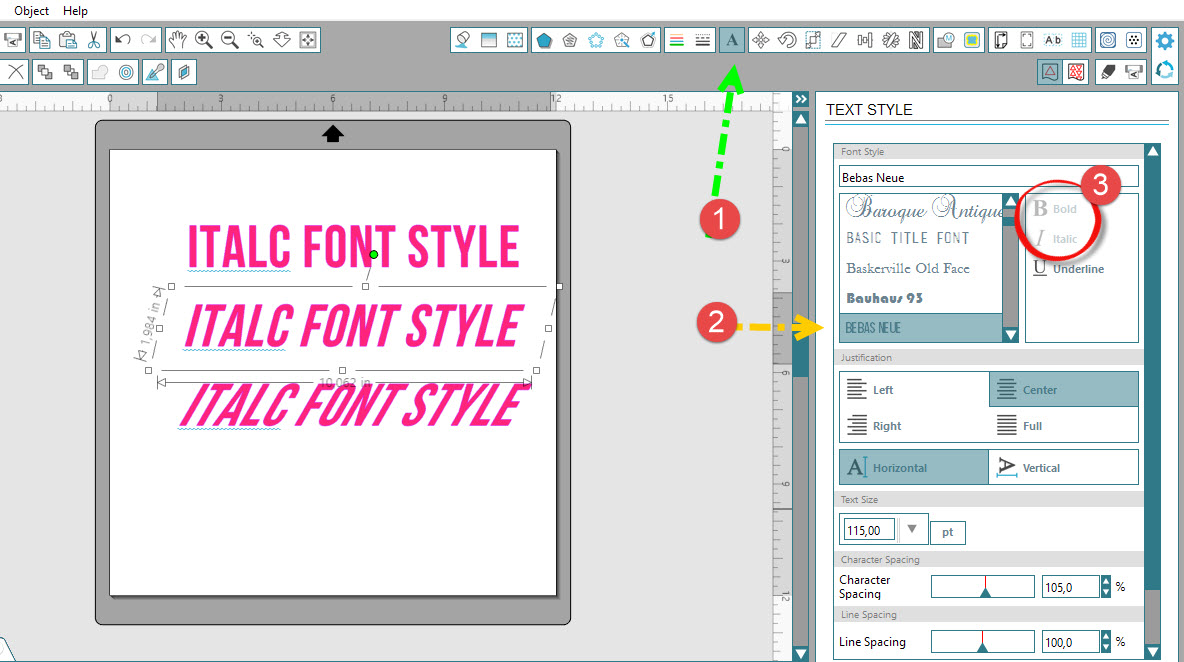
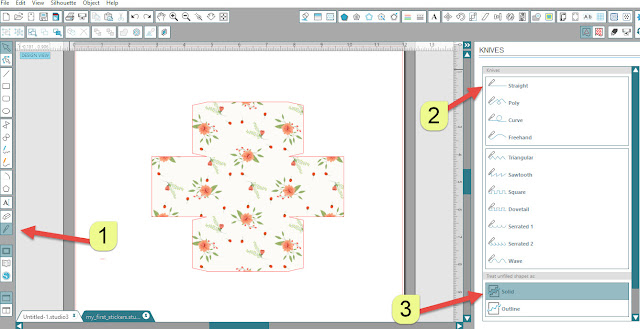
Hi there, If you are a newbie in Silhouette Studio, I would like to share with you how to use the Knife. Open up a design in your Silhouette Library, it is not so important wich one. Hej på er, Om du är ny på Silhouette Studio, vill jag dela ett enkelt sätt hur man använder Kniv Verktyget. Öppna upp en design från ditt Silhouette Bibiliotek, inte så noga vilken, eftersom det här bara är en övning. Select the knife tool Cut straight Solid cutting, play around with Solid and Outline cutting, and see the differents Välj "Knife" verktyget Välj "Cut Straight" (skär rakt) Välj "Solid" skärning, här kan du testa att använde båda alternativen för att lära dig skillnaden mellan "Solid och Outline". with the knife tool selected  and the straight knive selected Put your mouse where you would like to make your cut, hold down Shift-Key and drag the mouse down, your Knife will cut straight. This is just so you can see the ga

Silhouette Tip of the Day! Nu även på Svenska!

Bild
Hi there, Today I'm going to share with you, how to solve the problem with curved cutted cardstock. And this one is easy, if your sticky cutting mat is new and very sticky, most of the time the cutted item get slightly curved when you remove it from the cutting mat ( New Cutting Mat ). So I find out that if I turn the sticky side of the cutting mat down when I'm going to remove the cutted pieces, then peel/scrape of the cutted pieces carefully while I bend the cutting mat slightly. This works for me and I hope it does for you too! Hej på er, Idag ska jag dela med mig hur man löser problemet med att den cardstock/pappers bit man skriver ut alltid blir böjd. Jag upptäckte att om jag vänder Skärmattan med den klibbiga sidan ner, när jag ska ta bort det som jag skurit ut, samtidigt som jag böjer skärmattan lite lätt, skrapar jag av den utskurna biten med typ ett kreditkort eller Silhouette spateln. Det har fungerat för mig och jag hoppas att det gör det för dig ocks