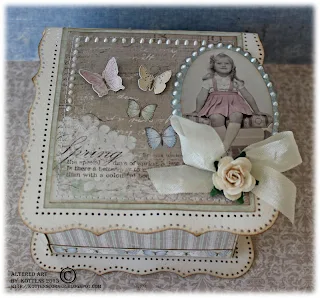
Jewellery box #tutorial
Hi there,
today I have a Jewellery box tutorial for you.


 Then cut out patterned papers for the remaining walls. Ink them and glue them into place.
2 1/8″ x 4 1/4″ four pieces. Also add the third piece of the smaller paper on the outside of the visible part of the box.
Then cut out patterned papers for the remaining walls. Ink them and glue them into place.
2 1/8″ x 4 1/4″ four pieces. Also add the third piece of the smaller paper on the outside of the visible part of the box.

If you use very thick high quality patterned paper you can use it for the inner walls. Or you can use lighter papers double. Otherwise you need to cut out cardstock for the inner walls.
5 1/4″ x 1″ and 2 7/8″ x 1″ two pieces
Fold the 5 1/4″ piece by 0.5″ from each side.
Ink it an glue it into the box
Fold the two smaller pieces by 0.5″ from each side as well and glue them into the box.

You can still see the glue that hasn’t dried yet. Sorry for that. :)
The base for the box is finished and feel free to decorate it as you wish. :)
Now for the smaller box…
Fold the small box 1″ on each side, cut flaps and ink the folded edges… Basically the same thing you did with the larger box but with smaller measurements.
Cut out two patterned papers in size 3 3/8″ x 3 7/8″, ink the edges and glue it to each side of the bottom of your box.

Cut out patterned papers to cover the flaps, ink them and glue them into place.
1″ x 3 1/2″ four pieces


today I have a Jewellery box tutorial for you.


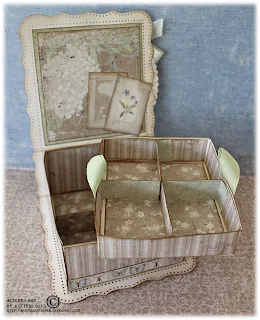
The inside of the jewellery box is in two different layers…

And here’s a little guide on how to make one… Thanks to Marianne Skjelstad for the great idea.
For one jewellery box you’ll be needing…
Cardstock
12″ x 5″ for the base
8 3/8″ x 8 3/4″ for the largest jewellery box
5 5/8″ x 6″ for the smallest jewellery box
Patterned papers acc to text below.
Punch Around The Page set
Ink
Ribbon
Embellishments
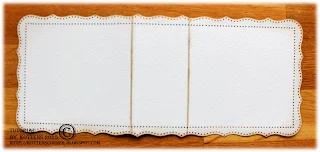
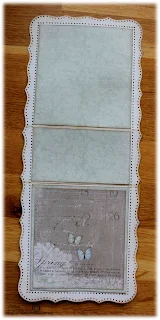
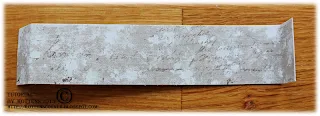
Fold the base by 4 7/8″. Turn it around and fold it again.

Use a Punch Around The Page set to create the border and ink the edges on both sides of the paper. I have used a Martha Stewart set called Cherish and inked the border with Distress Ink Pumice Stone and Walnut Stain.

Add patterned papers to the base.
3 7/8″ x 4 1/4″ three pieces (two for the outside and one for the inside of the lid)
3 7/8″ x 2 1/8″

Now it’s time to make the actual jewellery boxes…
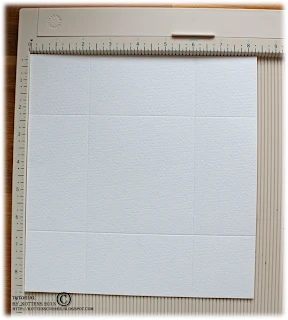
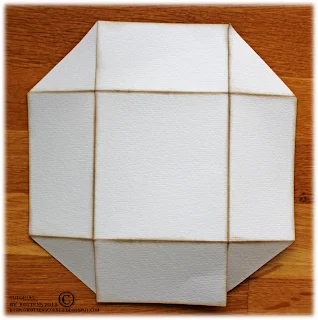
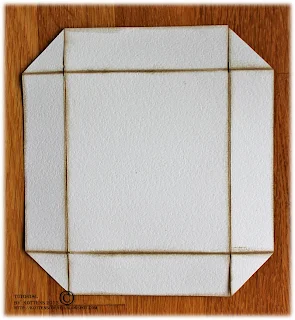
Start with the largest (8 3/8″ x 8 3/4″) and fold it by 2 1/4″ on all sides.

Cut flaps and ink the folded edges…

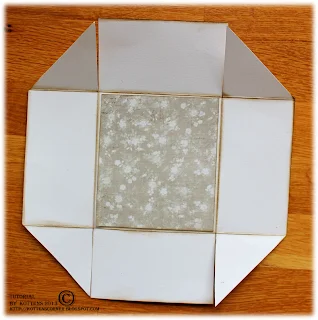
Cut out patterned paper in size 3 5/8″ x 4 1/8″, ink the edges and glue it to the bottom of your box.

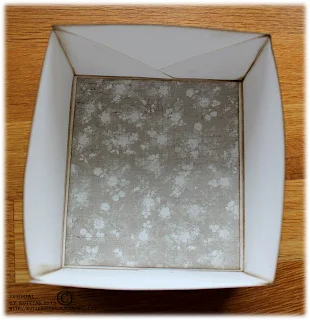
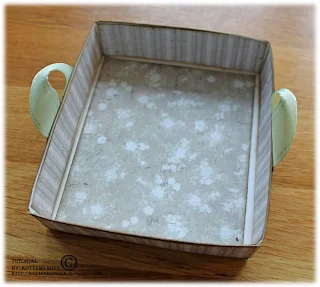
Then glue the flaps and fold the box together.

The thicker paper you use the sturdier the box will be. These boxes are both made with Maja Design papers that are as far as I know the thickest papers on the market.
Cut out patterned papers to cover the flaps, ink them and glue them into place.
2 1/8″ x 3 3/4″ three pieces


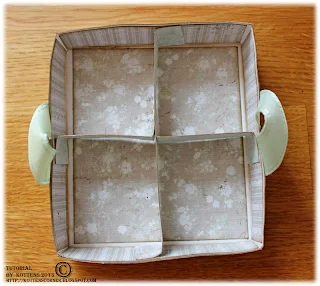
If you use very thick high quality patterned paper you can use it for the inner walls. Or you can use lighter papers double. Otherwise you need to cut out cardstock for the inner walls.
5 1/4″ x 1″ and 2 7/8″ x 1″ two pieces
Fold the 5 1/4″ piece by 0.5″ from each side.

Ink it an glue it into the box
Fold the two smaller pieces by 0.5″ from each side as well and glue them into the box.

You can still see the glue that hasn’t dried yet. Sorry for that. :)
The base for the box is finished and feel free to decorate it as you wish. :)
Now for the smaller box…
Fold the small box 1″ on each side, cut flaps and ink the folded edges… Basically the same thing you did with the larger box but with smaller measurements.

Cut out two patterned papers in size 3 3/8″ x 3 7/8″, ink the edges and glue it to each side of the bottom of your box.

Cut out patterned papers to cover the flaps, ink them and glue them into place.
1″ x 3 1/2″ four pieces

Then cut out patterned papers for the remaining walls. Ink them and glue the pieces on the inside.
1″ x 3 7/8″ four pieces
For the outside… Add some ribbon to each side of the box so you can easily lift the box with them. Also add the third and fourth pieces of the smaller papers on the outside of the the box.

Now it’s time for the inner walls…
Cut out the following from heavy weight patterned paper or cardstock
5″ x 7/8″
2 3/4″ x 7/8″ two pieces
Fold all pieces by 0.5″ from each side and glue them the same way you did on the large box.

Glue the large box so it fits the cover.

Supplies used:
Maja Design Vintage Spring Basics collection
5th of March
7th of March
9th of March
10th of March
7th of April
Days To Remember
The other stuff…
Martha Stewart Punch Around The Page set Cherish
Distress Ink Pad Pumice Stone
Distress Ink Pad Walnut Stain
Pearl Maker White
Rose by Wild Orchid Crafts
Spellbinders Nestabilities Ovals
Spellbinders Nestabilities Scalloped Ovals
This tutorial is from Kottens Corner
Happy Creating;)
Anki J


Kommentarer
Skicka en kommentar