How-To use the Silhouette Cameo: Silhouette Sketch Pens
Hi there,
today we are going to solw out the How To use the Sketch Pens in your Silhouette Cameo. Made by
If you’re new to your Silhouette cutting machine, this “How To useyour Silhouette Cameo” series is perfect for you! Today we’re covering how to use Silhouette Sketch Pens, and learn more about this awesome crafting product!

Silhouette sketch pens are perfect for getting a hand-drawn look. They’re great for making invitations, cards, place cards, or even just a few sketches to hang up as wall art. Plus, once the sketch pens are done sketching you can put the regular cutting blade back in place to cut out your design in a fun shape!
HOW TO USE A SILHOUETTE CAMEO: SILHOUETTE SKETCH PENS
Here’s what you need: (affiliate links below to the products I use and recommend)
a Silhouette cutting machine
Silhouette sketch pens
paper to draw on
HOW TO USE SILHOUETTE SKETCH PENS
The first step is to get your design set up, just like you normally would, in the Silhouette Studio software. Anything that your Cameo or Portrait can cut out with its regular blade, it can draw instead if you switch out the blade for a sketch pen. So pull up a design in your Studio software and let’s get started!
Open the Cut Settings window once you have your design loaded. You should see thick red lines covering all of the lines of your design.

By default, all lines in your project are set to “Cut” so that the machine knows to cut those lines. But with sketch pens, the pen will be drawing instead of cutting. Anything that is set to “Cut” will instead be drawn with your sketch pens. In this example, I didn’t want to draw the outside border, so I selected it and changed the Cut Style to “No Cut”.

Then, because I wanted each line of text to be drawn in a different color, I also selected all but the first line of text and changed their Cut Styles to “No Cut” as well.
Now the only thing with a thick red line on top of it should be the piece of your design that you want drawn (or, if you want to use multiple colors in your design, the thick red line should only show on whichever piece you want to draw first.)
Scroll further down in your Cut Settings window on the right until you find the Material Type section; choose Silhouette Sketch Pen. It should do this next piece automatically for you, but in the next section down, make sure it changes the Blade Type to Sketch Pen and shows a little image of a sketch pen.

You are here: Home / Projects / How To Use A Silhouette Cameo: Silhouette Sketch Pens
How To Use A Silhouette Cameo: Silhouette Sketch Pens
July 14, 2014 by Jessi Wohlwend 45 Comments
Silhouette sketch pens are a really fun way to use your Silhouette Cameo or Portrait to draw instead of cut! They come in tons of different colors (even metallics and glitter!), and they’re incredibly easy to use. If you’ve ever pulled out your cutting blade to change the blade depth, and then reinstalled it into the machine, you can use sketch pens!
If you’re new to your Silhouette cutting machine, this “How To Use A Silhouette Cameo” series is perfect for you! Today we’re covering how to use Silhouette sketch pens, so pull up a chair and learn more about this awesome crafting product!
Learn how to use Silhouette sketch pens to draw with your Silhouette Cameo or Portrait!
Silhouette sketch pens are perfect for getting a hand-drawn look. They’re great for making invitations, cards, place cards, or even just a few sketches to hang up as wall art. Plus, once the sketch pens are done sketching you can put the regular cutting blade back in place to cut out your design in a fun shape!
HOW TO USE A SILHOUETTE CAMEO: SILHOUETTE SKETCH PENS
Here’s what you need:
*Silhouette cutting machine
*Silhouette sketch pens
*paper to draw on
The first step is to get your design set up, just like you normally would, in the Silhouette Studio software. Anything that your Cameo or Portrait can cut out with its regular blade, it can draw instead if you switch out the blade for a sketch pen. So pull up a design in your Studio software and let’s get started!
Open the Cut Settings window once you have your design loaded. You should see thick red lines covering all of the lines of your design.
How To Use Silhouette Sketch Pens
By default, all lines in your project are set to “Cut” so that the machine knows to cut those lines. But with sketch pens, the pen will be drawing instead of cutting. Anything that is set to “Cut” will instead be drawn with your sketch pens. In this example, I didn’t want to draw the outside border, so I selected it and changed the Cut Style to “No Cut”.
How To Use Silhouette Sketch Pens-2
Then, because I wanted each line of text to be drawn in a different color, I also selected all but the first line of text and changed their Cut Styles to “No Cut” as well.
Now the only thing with a thick red line on top of it should be the piece of your design that you want drawn (or, if you want to use multiple colors in your design, the thick red line should only show on whichever piece you want to draw first.)
Scroll further down in your Cut Settings window on the right until you find the Material Type section; choose Silhouette Sketch Pen. It should do this next piece automatically for you, but in the next section down, make sure it changes the Blade Type to Sketch Pen and shows a little image of a sketch pen.
How To Use Silhouette Sketch Pens-4
Now it’s time to tell your Silhouette machine to draw!
HOW TO LOAD A SKETCH PEN INTO YOUR SILHOUETTE CUTTING MACHINE
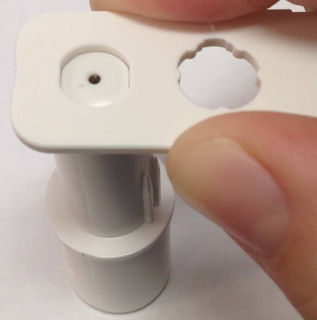
First, lift the lid of your machine and remove the cutting blade by turning the small blue knob to the left and lifting the blade out of the housing. Then choose the sketch pen color you want to use, pull the lid off of the pen, and place it, point down, into the housing.
Do you see where the pen gets thicker in the photo below? Make sure you push the pen all the way down into the holder so that the fattest part of the pen is hitting the top of the holder and the pen can’t go any further in. If you don’t get the pen all the way in, it won’t quite reach the paper and your Silhouette will draw on air instead of on your paper!

Once your pen is loaded, place your paper onto your cutting mat, pressing down firmly all over, and load the cutting mat into the machine.
Go back to your computer and click Send To Silhouette at the bottom of the Cut Settings window, or click on the Send To Silhouette icon in the bar at the top, then click Start, and your machine should start to draw out your design!

Once the machine is done drawing, don’t unload your paper yet! If you want to continue drawing using a different color, or if you want to cut out your design once it’s finished drawing, leave the cutting mat exactly where it is and move on to the next steps of the tutorial!
If all you wanted was a single drawing in one color with no cuts, you’re done! You can tell the machine to unload and then pull your design off the cutting mat.
HOW TO USE SILHOUETTE SKETCH PENS WITH MULTIPLE COLORS
If you want your design to have multiple colors, don’t unload the cutting mat once the first color has finished! Leave it exactly where it is and go back to your computer to get the second piece of the design set up.
In the Cut Settings window, select the piece of the design that was just drawn, and change the Cut Style to “No Cut”; you don’t want to draw that piece a second time! Then select the next piece of the design that you want drawn, and change the Cut Style to “Cut”. Be very careful not to reposition your design on the screen as you do this, or your lines will be slightly off!

Make sure everything else is still set to “No Cut”. Then remove the first sketch pen from the holder and put the new sketch pen in, following the same instructions above.
Click Send To Silhouette again to tell the machine to start drawing the second piece of the design.
Repeat these steps for each new pen color until your whole design has been drawn.
Once the machine is done drawing with the last sketch pen, don’t unload your paper yet! If you want to cut out your design, leave the cutting mat exactly where it is and move on to the next step of the tutorial!
If all you wanted was a single drawing in multiple colors with no cuts, you’re done! You can tell the machine to unload and then pull your design off the cutting mat.
HOW TO CUT OUT A SKETCHED DESIGN
The last step is to cut out your beautiful sketch!
In the Cut Settings window, make sure all of the pieces that you have already drawn are set to “No Cut”. Select the outside border that you want to cut, and change the Cut Style to “Cut”. Then select the appropriate Material Type; I used heavy cardstock for this project, so I selected “Coverstock” from the Material Type menu.

Scroll down in the Cut Settings window; once you select a new Material Type the software should automatically change the Blade Type back to Silhouette Ratchet Blade for you. Look at the recommended settings, and adjust your blade depth accordingly.
Then, following the same instructions as before, remove the sketch pen from the holder and put the cutting blade back in.
Click Send To Silhouette to tell your machine to start cutting!

This time, once the machine is done cutting, unload your cutting mat and remove your design.
And you’re finished! You now have a fun sketch in multiple colors!

Happy Creating;)
Anki J
today we are going to solw out the How To use the Sketch Pens in your Silhouette Cameo. Made by
If you’re new to your Silhouette cutting machine, this “How To useyour Silhouette Cameo” series is perfect for you! Today we’re covering how to use Silhouette Sketch Pens, and learn more about this awesome crafting product!
Silhouette sketch pens are perfect for getting a hand-drawn look. They’re great for making invitations, cards, place cards, or even just a few sketches to hang up as wall art. Plus, once the sketch pens are done sketching you can put the regular cutting blade back in place to cut out your design in a fun shape!
HOW TO USE A SILHOUETTE CAMEO: SILHOUETTE SKETCH PENS
Here’s what you need: (affiliate links below to the products I use and recommend)
a Silhouette cutting machine
Silhouette sketch pens
paper to draw on
HOW TO USE SILHOUETTE SKETCH PENS
The first step is to get your design set up, just like you normally would, in the Silhouette Studio software. Anything that your Cameo or Portrait can cut out with its regular blade, it can draw instead if you switch out the blade for a sketch pen. So pull up a design in your Studio software and let’s get started!
Open the Cut Settings window once you have your design loaded. You should see thick red lines covering all of the lines of your design.
By default, all lines in your project are set to “Cut” so that the machine knows to cut those lines. But with sketch pens, the pen will be drawing instead of cutting. Anything that is set to “Cut” will instead be drawn with your sketch pens. In this example, I didn’t want to draw the outside border, so I selected it and changed the Cut Style to “No Cut”.
Then, because I wanted each line of text to be drawn in a different color, I also selected all but the first line of text and changed their Cut Styles to “No Cut” as well.
Now the only thing with a thick red line on top of it should be the piece of your design that you want drawn (or, if you want to use multiple colors in your design, the thick red line should only show on whichever piece you want to draw first.)
Scroll further down in your Cut Settings window on the right until you find the Material Type section; choose Silhouette Sketch Pen. It should do this next piece automatically for you, but in the next section down, make sure it changes the Blade Type to Sketch Pen and shows a little image of a sketch pen.
You are here: Home / Projects / How To Use A Silhouette Cameo: Silhouette Sketch Pens
How To Use A Silhouette Cameo: Silhouette Sketch Pens
July 14, 2014 by Jessi Wohlwend 45 Comments
Silhouette sketch pens are a really fun way to use your Silhouette Cameo or Portrait to draw instead of cut! They come in tons of different colors (even metallics and glitter!), and they’re incredibly easy to use. If you’ve ever pulled out your cutting blade to change the blade depth, and then reinstalled it into the machine, you can use sketch pens!
If you’re new to your Silhouette cutting machine, this “How To Use A Silhouette Cameo” series is perfect for you! Today we’re covering how to use Silhouette sketch pens, so pull up a chair and learn more about this awesome crafting product!
Learn how to use Silhouette sketch pens to draw with your Silhouette Cameo or Portrait!
Silhouette sketch pens are perfect for getting a hand-drawn look. They’re great for making invitations, cards, place cards, or even just a few sketches to hang up as wall art. Plus, once the sketch pens are done sketching you can put the regular cutting blade back in place to cut out your design in a fun shape!
HOW TO USE A SILHOUETTE CAMEO: SILHOUETTE SKETCH PENS
Here’s what you need:
*Silhouette cutting machine
*Silhouette sketch pens
*paper to draw on
If you like the sketchy fonts I used in this project, you can find them here:
HOW TO USE SILHOUETTE SKETCH PENSThe first step is to get your design set up, just like you normally would, in the Silhouette Studio software. Anything that your Cameo or Portrait can cut out with its regular blade, it can draw instead if you switch out the blade for a sketch pen. So pull up a design in your Studio software and let’s get started!
Open the Cut Settings window once you have your design loaded. You should see thick red lines covering all of the lines of your design.
How To Use Silhouette Sketch Pens
By default, all lines in your project are set to “Cut” so that the machine knows to cut those lines. But with sketch pens, the pen will be drawing instead of cutting. Anything that is set to “Cut” will instead be drawn with your sketch pens. In this example, I didn’t want to draw the outside border, so I selected it and changed the Cut Style to “No Cut”.
How To Use Silhouette Sketch Pens-2
Then, because I wanted each line of text to be drawn in a different color, I also selected all but the first line of text and changed their Cut Styles to “No Cut” as well.
Now the only thing with a thick red line on top of it should be the piece of your design that you want drawn (or, if you want to use multiple colors in your design, the thick red line should only show on whichever piece you want to draw first.)
Scroll further down in your Cut Settings window on the right until you find the Material Type section; choose Silhouette Sketch Pen. It should do this next piece automatically for you, but in the next section down, make sure it changes the Blade Type to Sketch Pen and shows a little image of a sketch pen.
How To Use Silhouette Sketch Pens-4
Now it’s time to tell your Silhouette machine to draw!
HOW TO LOAD A SKETCH PEN INTO YOUR SILHOUETTE CUTTING MACHINE
First, lift the lid of your machine and remove the cutting blade by turning the small blue knob to the left and lifting the blade out of the housing. Then choose the sketch pen color you want to use, pull the lid off of the pen, and place it, point down, into the housing.
Do you see where the pen gets thicker in the photo below? Make sure you push the pen all the way down into the holder so that the fattest part of the pen is hitting the top of the holder and the pen can’t go any further in. If you don’t get the pen all the way in, it won’t quite reach the paper and your Silhouette will draw on air instead of on your paper!
Once your pen is loaded, place your paper onto your cutting mat, pressing down firmly all over, and load the cutting mat into the machine.
Go back to your computer and click Send To Silhouette at the bottom of the Cut Settings window, or click on the Send To Silhouette icon in the bar at the top, then click Start, and your machine should start to draw out your design!
Once the machine is done drawing, don’t unload your paper yet! If you want to continue drawing using a different color, or if you want to cut out your design once it’s finished drawing, leave the cutting mat exactly where it is and move on to the next steps of the tutorial!
If all you wanted was a single drawing in one color with no cuts, you’re done! You can tell the machine to unload and then pull your design off the cutting mat.
HOW TO USE SILHOUETTE SKETCH PENS WITH MULTIPLE COLORS
If you want your design to have multiple colors, don’t unload the cutting mat once the first color has finished! Leave it exactly where it is and go back to your computer to get the second piece of the design set up.
In the Cut Settings window, select the piece of the design that was just drawn, and change the Cut Style to “No Cut”; you don’t want to draw that piece a second time! Then select the next piece of the design that you want drawn, and change the Cut Style to “Cut”. Be very careful not to reposition your design on the screen as you do this, or your lines will be slightly off!
Make sure everything else is still set to “No Cut”. Then remove the first sketch pen from the holder and put the new sketch pen in, following the same instructions above.
Click Send To Silhouette again to tell the machine to start drawing the second piece of the design.
Repeat these steps for each new pen color until your whole design has been drawn.
Once the machine is done drawing with the last sketch pen, don’t unload your paper yet! If you want to cut out your design, leave the cutting mat exactly where it is and move on to the next step of the tutorial!
If all you wanted was a single drawing in multiple colors with no cuts, you’re done! You can tell the machine to unload and then pull your design off the cutting mat.
HOW TO CUT OUT A SKETCHED DESIGN
The last step is to cut out your beautiful sketch!
In the Cut Settings window, make sure all of the pieces that you have already drawn are set to “No Cut”. Select the outside border that you want to cut, and change the Cut Style to “Cut”. Then select the appropriate Material Type; I used heavy cardstock for this project, so I selected “Coverstock” from the Material Type menu.
Scroll down in the Cut Settings window; once you select a new Material Type the software should automatically change the Blade Type back to Silhouette Ratchet Blade for you. Look at the recommended settings, and adjust your blade depth accordingly.
Then, following the same instructions as before, remove the sketch pen from the holder and put the cutting blade back in.
Click Send To Silhouette to tell your machine to start cutting!
This time, once the machine is done cutting, unload your cutting mat and remove your design.
And you’re finished! You now have a fun sketch in multiple colors!
Happy Creating;)
Anki J