Inlägg

3D-Painting as a Wedding Gift

Bild
Hi there, I made this 3D-painting with thoughtful words as a wedding gift, and the couple that got it was very pleased with it, and so was I How to make in Silhouette Studio: I found this lovely phrase in Silhouette Store, and for this purpose it was perfect. I don't have the #ID for it but if you search for "for better of worse" I think you can find it. I adjust the phrase to fit in to my painting/canvas and then cutted it out in my Cameo 1 on vinyl. Stick it to the painting/canvas and then put some Relief Pasta, the brand I used is "Art Collection", on the words as thick as I could. Let it dry and then remove the vinyl, don't forget the small parts inside the letters.  Now it should look like this! I painted everything in black acrylic, I let it dry for  a couple of hours. I colored the words, also with acrylic paint, with with different colors as you can see on the finished result at the top of this short tutorial. H

Silhouette Freebie Sunday, and a Star Mobile to fetch

Bild
Hi there, and Happy Sunday, time for a new Freebie. This Star Mobile is made of paper but you can also cut it out in plastic or fabric. The tricky part was to sew between the stars. Here you can download Your Free Silhouette v3 file I cutted out the stars on double sided cardstock I cut the thread inside the open stars Happy creating;)

How-to Decorate a Paper bag with Silhouette Cameo/Portrait/Curio.

Bild
Hi there, It is so easy to make a dull paper bag into a personal paper gift bag! AFTER BEFORE I used some vinyl for both of thes paper bags. And for the "Made Just for You" I make it like this: I open Silhouette Studio and in the library I found the perfect word for this paper bag, you can buy it from the Design Store or make your own, I don't have the #Id for it but  you can search for "Made Just for You", this is a Samantha Walker design. I modify it to fit my paper bag. First Ungroupe the phrase, Then Mark the first wordfilling Groupe those and do the same with the phrase "Made Just For You". Now you can move them easily. Open the Grid Window and select "Show Grid" adjust the 2 groups, I cut mine in Grey vinyl and for the phrase I use pink vinyl, as you can see on the picture above. I always try to cut out only one time, so I put the grey vinyl at the top and the pink at

How-To use the Text Tool in Silhouette Studio

Bild
Hi there, Here is a short video of how to use the Text Tool in Silhouette Studio, it's made for Silhouette Studio beginners. Happy Creating;)

Freebie Sunday, Place Cards for New Year Party!

Bild
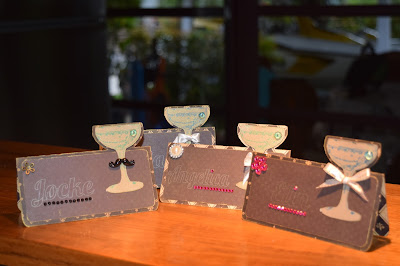
Hi there, and Happy Sunday, time for a new Freebie. These  Place Cards are great for New Year Party or any party! Here you can download Your Free Silhouette v3 file Happy Creating;)

Glitter on Wine Glass

Bild
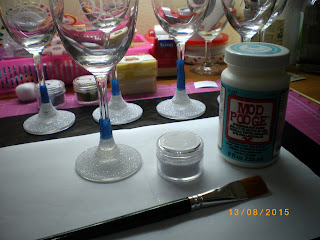
Hi there, To highlight glass is a good way to make them special, and easy to, it just take some time to do it. I did these as a weeding present for my friend Johan and Somphit. Clean your glass with some alcohol, and mask them where you would like to have  the start of the glitter.  I useed ModPodge that was dishwaser-safe for glass.  And the glitter was from Silhouette, but next time I'm going to find some fine-grained glitter, which I think are going to look much better. I'm so sorry that I didn't took some pictures of how to put the glittter on.  But I know there is a lot of it on Youtube. I put a copypaper on my desk as a cover and also to save the glitter. Put Mod Podge on the glass with a brush,  Sprinkle the glitter on the glass while you roll the glass. Take the copypaper and put the glitter that are there back to the jar. Let it dry, just by following the instructions on the Mod Podge label. Repeat  step 2 - 5 at least 3 times.

Silhouette Tip of the Day!

Bild
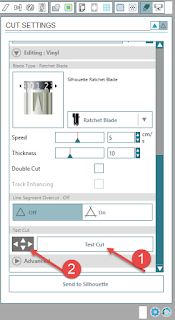
Hi there, todays Tip is about Test Cut in Silhouette Studio. I always do it befor I cut, because some times your cutting blade is a litle bit old and then it will not cut properly. The Tip of the Day is ALWAYS TEST CUT before you cut! Test cut If your Silhouette cutter don't cut or moves when you have hit the Test Cut button, you can move the cutter head manually by pressing the arrows here. Happy Creating;)