Inlägg

My own Domainname

Hi there, today I have reg my own domainname, so from now you can see and search on www.ankiscreation.com  Just a BIG smile from me, because this have being for a looong time on my "to do list". And remeber to morrow is a new Freebie!! Happy Creating;) Anki J

2-in-1 tutorial Dingbats + Fill Pattern in Silhouette.

Bild
Hi there, Dingbats! What a heck is that?? Silhouette Studio Software lets us use any font installed on ourPC's.   DaFont.com is one of many webisites, where you can find a lot of image/icon fonts (Dingbats). Install the Dingbat you going to use, restart Silhouette Studio, in this tutorial I use Mellow Fonts 1 Open The the text style window Type in the Dingbat font that you are going to use. Use the text tool to type in font images.  Be sure to use both capital and lower case letters since many times the lower case is the mirror image of the upper case. Remember to click outside the typing area when you are finished. To turn your Dingbat, if it is not horizontally, just grabb the litle green dot and press down Shift Key, rotate it 90° CW, and you can feel that it is like a small notch there, Release your finger from the mouse and then from shift Key,  Or you can open the Rotate window And click on the symbol. As you can see here I use the capital case &qu

Freebie Sunday, week 38, Hand made label

Bild
Hi there, Happy Sunday and time for a new Freebie. This week I have made a "Hand made" label, that you can modify in your Silhouette Studio Software, or just use it as it is. I made it as a print and cut for the Silhouette sticker paper. Here you can download Your Free Silhouette v3 file And I have made a Tutorial   How to Print and Cut Stickers with  Silhouette Studio. And here you have the Tutorial for How to Curve Text with  Silhouette Studio. Happy Creating;) Anki J

Save Your Designs to Silhouette Studio Library

Bild
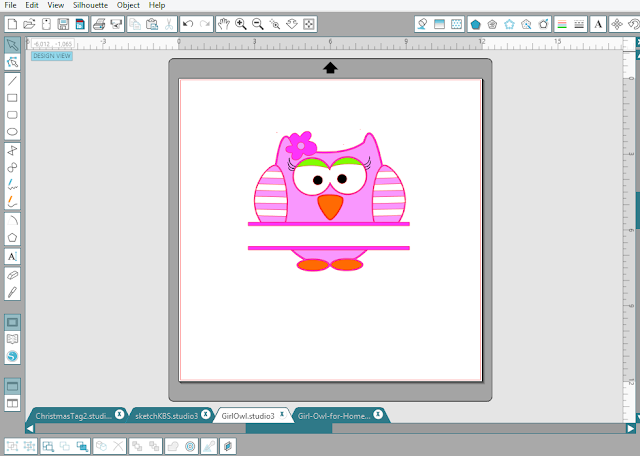
Hi there, Today I have some tips for you to save your Designs to Silhouette Studio Library so you can find it again. First, you have to create your design in Silhouette Studio. In this case, I use my own design Girl-Owl. Once the design is set up, go to FILE > SAVE AS > SAVE TO LIBRARY. Once the dialog box is open, you'll need to look at the right hand side to the EDIT PROPERTIES window and complete the necessary information. If you can't see "Edit Properties" just double click on the design you going to save. File name and Description are pretty obvious, but Keywords is the part that I really wanted to share with you. Keywords is where you'll list all the keywords you can think of that pertain to this particular cut file. Keywords is what will enable you to search for this particular design without having to remember the exact title! Isn't that exciting? Be sure to list as many keywords as you can think of, better safe than sorry! A

Pimped my Silhouette Cameo

Bild
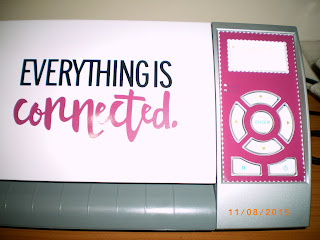
Hi there, how nice isn't this one!  I just love my Cameo and of course I pimped it, as you can see it is Cameo 1. I found the Free phrase at Kerri Bradfords Blog . I cut it out in black and dark pink (my favo). And for the display/control panel I have bought the design from Silhouette, Design ID # 42709, so I cut that out in the sam dark pink color as the phrase. I love this easy way  to make my Silhouette looks like "Me", and when I get tired of it, I'm just make a new one! Happy Creating;) Anki J

Freebie Sunday week 37, Tealight Card Template

Bild
Hi there Last year I made a youtube video How to make a TeaLight card. It was very tricky to measuring and cutting out the templates by hand, so I decided to make my own template for Silhouette, and here you can see the result. Here you can download Your Free Silhouette v3 file I put the youtube video here to so you know how beautiful TeaLight cards you can make! Happy Creating;) Anki J

How-to use Silhouette #SketchPens for Envelopes in Silhouette Studio Software

Bild
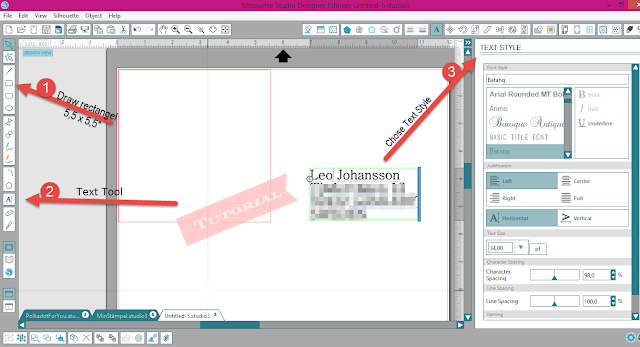
Hi there, How-to use Silhouette Sketch Pens for a beautiful design on Envelopes, can you imagine that! Short story: When I was in school long long time a go, my first teacher always said that I could not wright nice, so that have follow me all my life. Every time I have to wright something to give away I really don't like it, my teachers voice is in my head. But with these Sketch Pens I can just say WOW, now I can wright it out and it looks like a pro. So todays Tutorial is that subject. In Silhouette Studio Designer Edition, Draw a rectangel 5,5 x 5,5" that is the same size as my envelope. Open the Text Tool and click some where on the page where you will type your text,a big/small blue thing turn up where you should start your typing, and don't worry we are going to move it to the envelope when finished. Open your "Text Style Window"  and chose your text style, mine is Batang, if you don't have it you can google on Free Fonts Batang. I also p